





iPad Air 3 Front Glass Replacement | Glass Only Touch Digitiser for Refurbishing
iPad Air 3 Front Glass Replacement | Glass Only Touch Digitiser for Refurbishing
 In Stock
Added to your cart
Finish the job properly
ⓘ Add-on savings can't be combined with discount codes.

 12 month warranty


iPad Air 3 Front Glass Replacement | Glass Only Touch Digitiser for Refurbishing
iPad Air 3 Front Glass Replacement | Glass Only Touch Digitiser for Refurbishing
In Stock
Added to your cart
Finish the job properly
ⓘ Add-on savings can't be combined with discount codes.
The cracked glass is bonded to the working LCD and is cut off by machine. The new glass is then laminated on.
Watch the install videoBest left to an experienced repairer with specialised tools.
- Replacement 10.5-inch front glass with touch digitiser for the iPad Air 3 (2019), with the touch flex and Tesa edge tape fitted
- For refurbishing a screen with cracked glass or failed touch, when the LCD underneath still shows a perfect picture
- Compatible with iPad Air 3 (A2152, A2123, A2153, A2154)
Things you may need for this repair

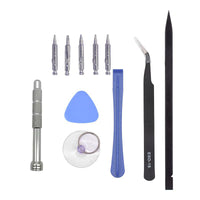


Things you may need for this repair


Product Details
Refurbishing a cracked iPad Air 3 screen? On the iPad Air 3 the glass and touch layer are bonded to the LCD with optical clear adhesive (OCA). This glass only part lets you keep a good LCD: separate the cracked glass on an LCD separator, then laminate this glass to the LCD with new OCA.
For a home repair, get the complete iPad Air 3 LCD and Digitiser Assembly instead, which fits straight in.
- GLASS AND TOUCH IN ONE - Front glass with the touch digitiser layer and touch flex cable already fitted.
- TESA EDGE TAPE FITTED - Tesa tape comes fitted round the edge for sealing the finished screen into the iPad.
- SENT FROM NZ STOCK - Shipped from our New Zealand stock, so there's no waiting weeks for a part to arrive from overseas.
Part Includes:
- Front glass with touch digitiser
- Touch flex cable, fitted
- Pre-fitted Tesa edge tape
- 12 Month Warranty
Please Note
Does NOT fit the iPad Pro 10.5" (2017), which looks the same but takes a different screen. Check the A number on the back of your iPad.
Please Note
Glass only, no LCD. Fitting it means separating the old glass from your LCD and laminating the new glass with OCA, which needs an LCD separator and laminator. For a home repair, get the iPad Air 3 LCD and Digitiser Assembly.
Please Note
OCA adhesive is not included. Aftermarket glass, not an official Apple part.
Specifications
- Type: Front glass and touch digitiser (no LCD), for screen refurbishing
- Size: 10.5-inch
- Touch Flex: Fitted
- Adhesive: Tesa edge tape fitted. OCA not included
- Home Button: Not included, your original moves across
- Colour: Black
- Condition: Brand new aftermarket
- Pairing: Not needed. This iPad doesn't check its screen, so no Unknown Part message.
- Warranty: 12 Months
Compatible Model Numbers
 iPad Air 3 WiFi
Model Number (A Number)
- A2152
 iPad Air 3 WiFi Model NumbersHow do I find my Model number?
Model Identifier
- iPad11,3
EMC Number
- EMC 3315
Device Number (M Number)
- MUUJ2
- MUUK2
- MUUL2
- MUUQ2
- MUUR2
- MUUT2
iPad Air 3 WiFi + CellularModel Number (A Number)
- A2123
- A2153
- A2154
iPad Air 3 WiFi + Cellular Model NumbersHow do I find my Model number?
Model Identifier
- iPad11,4
EMC Number
- EMC 3316
Device Number (M Number)
- MV152
- MV162
- MV172
- MV1D2
- MV1F2
- MV1G2
Installation Help

Check out the video above for assistance with this repair
The video shows the glass being separated from the LCD and re-laminated on a separator, laminator and bubble remover.

Here are some tools you may need to help you complete the repair.
- uFix iOpener Microwaveable Heated Bag Opening Tool
- CPB 320 Repair Heat Pad for mobile phones and tablets
- Large Blue Suction Cup Opening Tool
- iGadget Plastic Triangle Opening Picks (set of 5)
- Nylon Antistatic Spudger Pry Tool
- Mechanic AK-15 King ESD Anti-Static Stainless Steel Red Curved Tweezers
- iGadget Plastic Alcohol 200mL Bottle with Pump Top
- B7000 Multipurpose Liquid Repair Glue - 15ml

Here are some helpful tips to assist you in completing a safe repair on your device. If you are unsure of something or have any questions, please feel free to contact us either by phone (0508 IGADGET) or by email
- This is a workshop job. You'll need an LCD separator (hot plate and cutting wire), OCA cleaner, new OCA for this model, a laminator and a bubble remover.
- Take the screen out of the iPad first (see the full screen guide for your model).
- Don't bend the LCD when you lift the cracked glass off.
- Keep OCA cleaner away from the LCD edges and flex, and check the LCD under a light for any old OCA before you laminate.
- Mind where the LCD flex cables sit while you laminate.
- Move your own home button across to keep Touch ID. Its cable is very thin, so slide it out with tweezers slowly, and glue the bracket to the new screen with B7000.
- Test touch and the picture before you fit the screen back in the iPad, then seal it with the pre-fitted Tesa edge tape.
What’s In The Box
- 1x iPad Air 3 front glass and touch digitiser, touch flex and Tesa edge tape fitted
Things you may need for this repair


